The 4 Strike Zones in Pickleball (And Why You Need to Understand Them)
By Jorge Capestany, RSPA Master Professional & PTR International Master Professional
One of the simplest ways to improve your pickleball game…
Is to stop thinking in terms of “good shots” and “bad shots”…
And start thinking in terms of strike zones.
Because the truth is:
👉 The height of the ball you’re receiving largely determines the shot you should be sending back.
If you can recognize that quickly, your decision-making, and your consistency, improves almost immediately.
What Are Strike Zones?
Strike zones are simply where the ball is in relation to your body at contact.
In pickleball, we can break this down into four clear zones: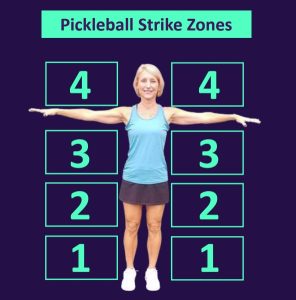
-
Zone 4 – Above the Shoulders
-
Zone 3 – Torso Height
-
Zone 2 – Knees to Hips
-
Zone 1 – Below the Knees
That’s it.
Simple… but incredibly powerful.
Why This Matters More in Pickleball Than Tennis
Even though tennis and pickleball use the same strike zones…
They play out very differently.
In tennis:
-
The ball bounces higher, and most contact happens in Zone 3
In pickleball:
-
The ball stays low, and most contact happens in Zone 2
👉 That’s a HUGE difference.
It means pickleball players must be much more comfortable:
-
Staying low, playing below net height, and controlling balls in uncomfortable positions
What Shots Occur In Each Strike Zone?
Now, let’s connect the zones to actual shot selection.
This is where things really click.
Zone 4 (Above Shoulders) → Attack
This is your most aggressive zone.
Common shots:
-
Overheads / Swing volleys
👉 If the ball is here, you should be thinking offense.
Zone 3 (Torso Height) → Control + Opportunity
This is a versatile zone.
Common shots:
-
Volleys / Controlled drives / Reset blocks
👉 You may attack… but you don’t have to.
Zone 2 (Knees to Hips) → Most Common Zone
This is the heart of pickleball.
Common shots:
-
Groundstrokes / Serves and returns / Dinks / Transition shots
👉 This is where most rallies are decided.
If you get comfortable here, your game improves fast.
Zone 1 (Below Knees) → Defend and Reset
This is your toughest zone.
Common shots:
-
Dinks / Low volleys / Half volleys
👉 This is not where you attack.
This is where you:
-
Stay patient / Reset the ball / Try to get back to neutral.
The Real Key: You Need a Coaching System/Language.
Here’s something important…
It’s not about whether you use 4 zones, 3 zones, or even your own variation.
It’s about having a system that everyone understands.
Instead of telling players:
-
“That was too high.”
-
“That was too low.”
You can say:
-
“That was a Zone 1 ball = you tried to attack it.”
-
“That was a Zone 4 ball = you should’ve been aggressive.”